


Hardware FAQ
Q: Can you provide the main technical specifications for the PioNext Mini?
A: Hello, below are the detailed technical specifications for the PioNext Mini.
| Printing Size | 80mm×70mm×80mm |
| Machine Size | 200mm×170mm×241mm |
| Package Size | 310mm×307mm×340mm |
| N.W. | 4.86kg |
| G.W. | 6.8kg |
| Printing Technology | LCD |
| Light Source Wavelength | 385nm、405nm |
| Resolution | 9K (8520*4320px) |
| Pixel Size | 14*19μm |
| Layer Thickness | 0.01-0.1mm |
| Printing Speed | Max.60mm/h |
| Touch Screen | 3.97-inch Capacitive Color Touch Screen |
| Slicing Software | PioNext BOX / CHITUBOX Dental |
| Data Transmission | USB/WIFI |
| Input Voltage | 100-240V~,50/60Hz |
| Power | 120W |
| Supported Consumables | Ceramic Crown Resin / Surgical Guide Resin / Crown & Bridge Resin / Temporary Restoration Resin / Denture Base Resin / Removable Die Model Resin / Ortho Model Resin / Ortho Model 2.0Resin and other official authorized resin |
Q: What are the dimensions of the PioNext Mini release film?
A: The dedicated release film dimensions are 110mm×100mm×0.3mm.
Q: Which resins are supported by the PioNext Mini?
A:
- It supports resins with wavelengths of 385nm and 405nm, including ceramic crown resin, temporary resin, guide resin, model resin, and all other PioNext brand resins.
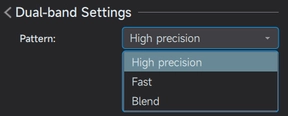
- Please select the correct light source type according to the compatibility of the resin being used:
- If printing with the 385nm band, select "High Precision Mode" in the dual-band settings.
- If printing with the 405nm band, select "Fast Mode" in the dual-band settings.
Q: What is the maximum amount of resin that can be added to the resin vat?
A: The total capacity of the resin vat is 300ml. It is recommended not to exceed 150ml (i.e., not exceeding the "Max" line).
Q: What is the lifespan of the LCD screen? Is it replaceable?
A: LCD screen lifespan: approx. 2,000 hours. Replace the LCD screen if it exceeds its lifespan or is damaged.
Q: How do I clean the build platform?
A: It is recommended to spray and clean with 95% industrial alcohol, use a metal scraper to remove cured residue, then wipe dry with a lint-free cloth and blow dry with an air gun.
Q: How should I handle hardware issues with the device (e.g., LCD not displaying)?
A: Please contact customer service and provide the device's SN code, firmware version, and printing parameters. The after-sales team will arrange for inspection, repair, or part replacement.
Q: What are the printing accuracy and layer thickness of the PioNext Mini respectively?
A:
- Printing accuracy (XY resolution): 9K (8520×4320 pixels)
- Layer thickness: adjustable from 0.01 mm to 0.1 mm.
Q: What is the light intensity of the PioNext Mini and its continuous working performance?
A: Specifications of the matching curing box are as follows:
- Curing light intensity: 150000~200000 mW/cm²
- Continuous working performance: maximum runtime of 99 minutes and 59 seconds.
- Recommended curing time: 2~10 minutes. The curing box delivers high light intensity; please adjust curing time according to resin type, model size and thickness.
Q: What are the differences between 385nm and 405nm light sources, along with their respective advantages and disadvantages?
A:
- 385nm: Delivers higher energy output for in-depth resin curing, with slightly weaker light penetration. Ideal for high-precision dental models and transparent resin printing.
- 405nm: Features superior light penetration to enable faster printing speed, with a minor trade-off in edge sharpness. Suitable for rapid prototyping and standard model resin printing.
Advantage of Mini dual-wavelength design: You may freely switch between 385nm and 405nm modes via slicing software without hardware replacement.
Software FAQ
Q: What slicing software should be used for the PioNext Mini?
A: Please use Piocreat Box (version v4.6.1.4133 or higher), PioNext Box, or Chitu Dental for slicing. Chitubox is currently not supported.
The minimum system requirements for Piocreat Box are as follows:
- Operating System Requirements: 64-bit Windows 7 or later, with Mac OS also supported; 32-bit operating systems are not supported.
Q: How do I adjust printing parameters (exposure time, layer height, etc.)?
A: Different resins require different parameters. Please refer to the following link: PioNext Mini printing parameters
Q: Can Piocreat Box or PioNext Box set different parameter configurations for different resin materials?
A: Yes. In the parameter page of the slicing software, you can create and save independent configurations such as exposure time and lift speed for each resin, making it easy to recall them as needed.
Q: If the model is relatively large and heavy, can small supports be used?
A: Not recommended. For large or heavy models, medium or large supports must be used to ensure reliability. Additionally, it is strongly recommended to hollow the model and properly design drain holes to reduce pull forces and save resin.
Q: After slicing, does the exported STL file contain resin printing parameters and support parameters?
A: No. The STL file exported from the slicing software contains only geometric model data. All resin printing parameters and support structure information are saved in the .cxdlpv4 format file generated by the slicer. Furthermore, when exporting an STL, the original supports become fused into the model and cannot be edited further.
Q: What should I do if importing a sliced model from a USB drive fails?
A:
-
Check the USB drive: Format the USB drive to FAT32 (with default allocation unit size). It is recommended to use a reliable USB drive of moderate capacity (e.g., 16G).
-
Check the slicing process: Confirm that the correct printer model was selected during slicing and that the slicing process was not interrupted. Try re-slicing or test with another USB drive.
-
Save the sliced file: First save the sliced file locally on your computer, then copy it to the USB drive. If the USB drive or computer USB port has poor contact, file corruption may occur during saving.
Q: Is there a dedicated cleaning machine compatible with PioNext Mini?
A: You can use the Mini Wash ultrasonic cleaner matched for PioNext Mini. Use 95% alcohol or isopropanol for cleaning with a cleaning duration of 3 to 6 minutes.
Q: I’m using Chitubox slicing software but cannot find PioNext Mini in the device list. How to solve this issue?
A: Chitubox V1.2.0 and later versions support configuration for PioNext Mini. Please update the software from Chitubox official website. Alternatively, PioNext Box is available for free download for your slicing work.
Q: Can you provide parameter packages (.cfg or .machine files) for Chitubox?
A: Printing parameters for PioNext Mini are preinstalled in Chitubox V1.2.0 and above; parameters are available right after adding the corresponding machine model. If you adopt third-party resin, parameters need manual debugging.
Q: What does shrinkage compensation parameter mean and how to adjust it?
A: Shrinkage compensation is designed to counteract the volumetric shrinkage of resin after curing by pre-scaling up model dimensions in software. Adjustment steps inside Piocreat Box:
- Navigate to Parameter Settings → Advanced.
- Locate Shrinkage Compensation and input respective compensation ratios for X and Y axes (e.g., 100.5% means 0.5% dimension enlargement).
- It is recommended to print a 10 mm calibration cube first. After measuring actual dimensions, calculate via formula: Compensation Value = (Designed Size / Actual Size) × 100%.
Q: Are printing parameters available for resins from other brands such as Detax and Formlabs?
A: We have established cooperation with several resin manufacturers and offer recommended parameters for mainstream brands including Bego and Keystone; please check PioNext Mini Printing Parameters document. Contact technical support with exact resin brand and model to obtain relevant parameter sheet. For non-cooperative third-party resins, precise preset parameters are unavailable, but the Third-party Resin Calibration Guide is provided for self-debugging.
Q: Is there all-in-one pre-parameterized software for plug-and-play use?
A: PioNext Box V1.9 and newer versions embed full parameter library for all PioNext series resins. Simply open Printer settings within software to one-click apply preset parameters like exposure time and lifting speed. Besides, commonly-used resin options are preloaded in machine firmware for quick selection.
Q: How long is the valid term of license key for Chitubox Dental Edition?
A: The authorization is valid for 3 months.
Q: Where can I download the latest dental slicing software?
A: Official download center: https://www.piocreat3d.com/software/
- Recommended software: latest PioNext Box version.
- Or acquire installation package via cloud disk link from technical support directly.
Printing FAQ
Q: What to do if printed models have defects or cavities?
A: Possible causes:
- Insufficient exposure time (it is recommended to increase exposure time gradually for testing).
- Too thin or inadequate supports (medium/large supports are recommended).
- Cured resin debris left in the resin vat (clean the resin vat and retry printing).
Q: How to remove supports easily after printing?
A: Soak the printed part in alcohol for 2 minutes before detaching supports, or cut them off directly with cutting pliers.
Q: How to improve unsatisfactory printing results?
A: Adjust the placement of model supports in slicing software to avoid support falling off during printing; do not set an excessively high print speed. Besides, printing performance is also affected by resin type, slicing parameters, model orientation and support configuration.
Q: How to delete historical print files/print records on the Mini device?
A: The current firmware does not support direct deletion of print records, and this feature will be added in future firmware updates. Follow the steps below for available operations:
- Tap the Print on the device home screen.
- Select historical files stored on local storage, then long-press the file name.
- Tap Delete on the pop-up menu to confirm removal.
If the relevant option is unavailable on your firmware, contact after-sales support to check firmware upgrade availability and obtain the firmware file.
Q: How long does it take to print one ceramic dental crown with PioNext Mini?
A: With ceramic dental resin and a layer thickness of 0.05 mm, printing a single anterior crown (approx. 25 mm in height) takes around 15 to 20 minutes. The time can be reduced to 7–12 minutes at a maximum with a 0.1 mm layer thickness.
Note: Printing duration varies depending on model dimension, placement orientation and resin material type.
Q: What is the complete post-processing procedure for ceramic dental crowns?
A: Standard post-processing workflow for 3D printed ceramic resin crowns:
- Cleaning: Wipe the part surface gently with tissue paper, lint-free cloth or soft brush dampened with 95% ethanol or isopropyl alcohol; ultrasonic cleaning is prohibited.
- Post-curing: Perform staged curing inside the Mini curing chamber for a total of 1–3 minutes with PWM power set between 30% and 60%.
- Sanding: Remove layered surface lines progressively using wet sandpaper ranging from 400-grit to 1200-grit.
- Staining & Glazing: Dip the crown in ceramic staining liquid before glazing and secondary sintering.