


User Manual
Safety and Care
- Use the printer only as described in the instructions to help prevent injury and property damage. This product is not intended for minors.
- Place the printer on a stable surface in a well ventilated area with little dust. Keep it away from heat sources and flammable or explosive materials.
- Avoid vibration and unstable surfaces. Do not shake or move the machine during printing, as this can affect print quality.
- Use recommended resin to avoid damage to the machine. Resin can irritate skin or cause an allergic reaction; wear protective gloves and avoid direct skin contact.
- Use the supplied power equipment and a grounded three prong outlet.
- Keep the plastic cover closed during printing. Opening it interrupts printing.
- Do not wear cotton gloves around moving parts; fabric can become entangled and cause injury or equipment damage.
- After printing, wait briefly before removing the part. Wear gloves and use suitable tools.
- Turn off the power before cleaning. Regularly remove dust and residue from the frame, guide rails and wheels with a dry cloth. Use glass cleaner or isopropyl alcohol to clean the print surface.
- Do not manually move the build platform or other mechanisms during startup. The protection system may shut down the printer.
- Follow local laws, professional ethics and safety requirements. Do not use the equipment for illegal purposes; PioCreat disclaims responsibility for users’ unlawful activities.
Printer Overview
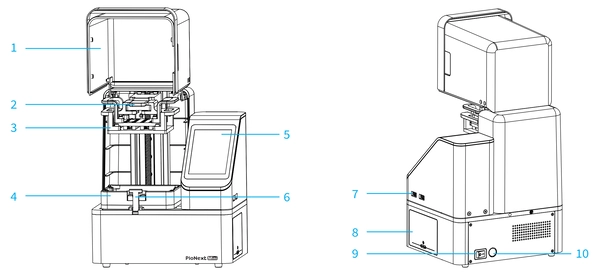
PioNext Mini front and rear views
|
No |
Component |
No |
Component |
|
1 |
Light shield |
6 |
Resin vat latch |
|
2 |
Platform clip |
7 |
USB port |
|
3 |
Build platform |
8 |
Curing chamber |
|
4 |
Resin vat |
9 |
Power switch |
|
5 |
Touchscreen |
10 |
Power port |
Included Equipment and Accessories
|
Item |
Quantity |
Item |
Quantity |
|
Printer |
1 |
Plastic blade |
1 |
|
Build platform |
1 |
Metal blade |
1 |
|
Resin vat |
2 |
Cutting pliers |
1 |
|
Resin vat dust cover |
2 |
USB A to A cable |
1 |
|
Wash Mini |
1 |
Paintbrush |
1 |
|
USB drive |
1 |
Disposable latex gloves |
1 |
|
Hex key set H2.0 H2.5 H3.0 H4.0 |
1 set |
Quality certificate |
1 |
|
PioNext Mini power adapter |
1 |
Quick start guide |
1 |
|
Wash Mini power adapter |
1 |
After sales service card |
1 |
|
Filters |
4 |
|
|
Note: The accessory list is for reference. Check the actual items supplied with your printer.
Technical Specifications
|
Parameter |
Specification |
|
Build volume |
80 × 70 × 80 mm |
|
Printer dimensions |
200 × 170 × 241 mm |
|
Package dimensions |
310 × 307 × 340 mm |
|
Net weight |
4.86 kg |
|
Gross weight |
6.8 kg |
|
Printing technology |
LCD |
|
Light source wavelengths |
385 nm and 405 nm |
|
Resolution |
9K 8520 × 4320 px |
|
Pixel size |
14 × 19 μm |
|
Layer thickness |
0.01–0.1 mm |
|
Printing speed |
Up to 60 mm/h |
|
Touchscreen |
3.97 inch capacitive color touchscreen |
|
Slicing software |
PioNext BOX and CHITUBOX Dental |
|
File transfer |
USB drive and WLAN |
|
Input voltage |
100–240 V AC 50/60 Hz |
|
Rated power |
120 W |
Supported materials include:
- Ceramic Crown Resin
- Surgical Guide Resin
- Crown & Bridge Resin
- Temporary Restoration Resin
- Denture Base Resin
- Removable Die Model Resin
- Ortho Model Resin
- Ortho Model 2.0 Resin and other officially authorized resins
Touchscreen Menus
The home screen provides Print, Curing and Settings. Use Settings to prepare the printer and access its maintenance functions.
- Cleaning: run resin vat cleaning. Check that the light source operates normally during the cleaning function.
- Z-axis move: access homing and leveling controls.
- Print Settings: configure print parameters and access Chamber Heating.
- System Settings: access Update, WLAN, Language & Region, Maintenance Tips, About Device and Reset.
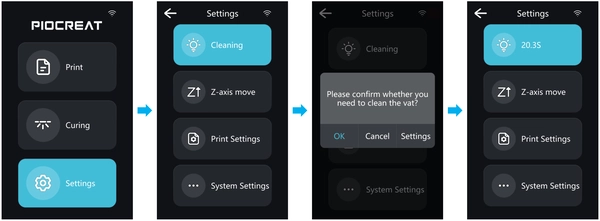
Home screen and resin vat cleaning controls
Note: The screens are illustrations. Follow the interface on your actual device and the released software.
Your First Print
Add Resin and Insert the USB Drive
1. Pour UV photosensitive resin into the resin vat.
2. Insert the USB drive containing the sliced files. Either USB port can be used to import print files.
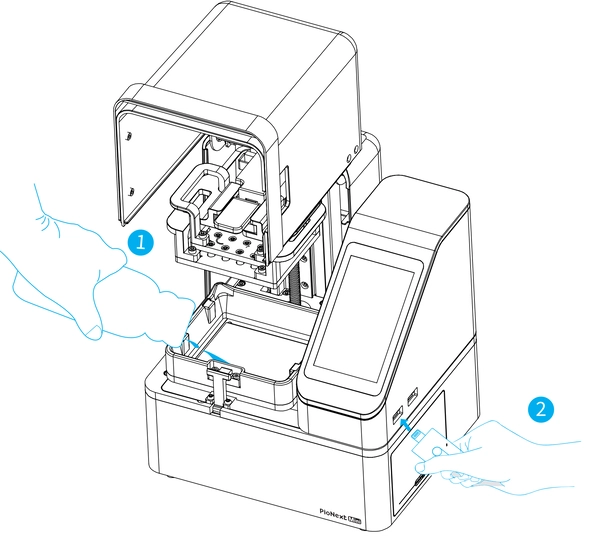
Add resin and connect a USB drive
To change resin, carefully remove the vat, pour the remaining resin into a container, clean the vat, add the new resin and reinstall it. Wear protective gloves to prevent resin from contacting your skin.
Set Chamber Heating
Open Settings > Print Settings > Chamber Heating.
1.Manual heating: leave Automatic Heating off, set the target temperature and tap Start Heating to preheat before printing.
2.Automatic heating: turn Automatic Heating on, set the temperature and tap OK to save. The printer will heat automatically during printing.
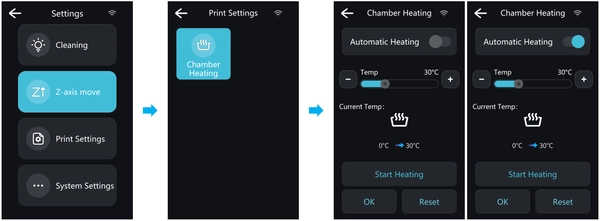
Manual and automatic chamber heating settings
Select a File and Start Printing
1. Tap Print on the home screen and select a sliced file from the print list.
2. Review the model preview and print information, then tap Start.
3. Use Pause, Stop or Settings as required during the print. Keep the printer stable and the cover closed.
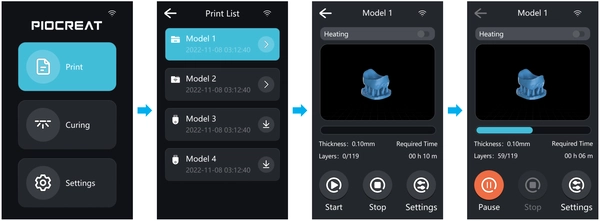
Print selection and progress screens
Remove the Printed Model
1. After the print is complete, lift the platform clip and remove the build platform.
2. Using both hands, press down on the build platform plate as shown to release the model directly from the plate.
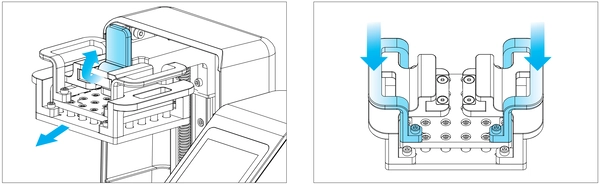
Release the platform clip and press the platform to remove the model
Wear disposable latex gloves when handling the platform and model to prevent contact with residual resin.
Use the Built In Curing Chamber
Load the Curing Chamber
1. Press inward on the curing chamber drawer to release it.
2. Remove the drawer, place the model inside and reinstall the drawer in the machine.
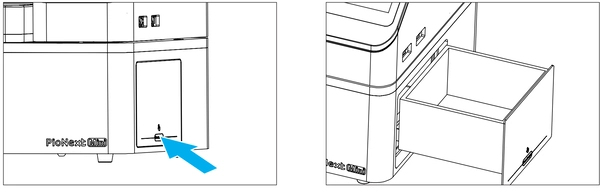
Open and load the curing chamber drawer
Start and Control Curing
1. Tap Curing on the home screen.
2. Use the on screen controls to set curing power and time, then tap Start.
3. Use Pause to pause the process. To end curing, tap Stop and confirm the prompt.
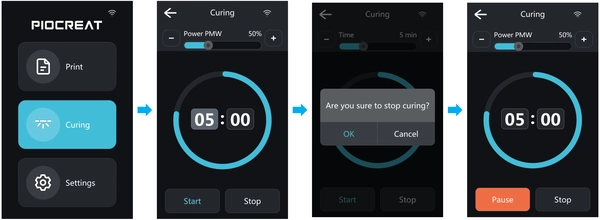
Curing power time and operating controls
Note: The 50% power and 5 minute values in the screenshots illustrate the interface. Use curing settings appropriate to your resin.
Do not remove the curing drawer while curing is in progress.
Ultrasonic Cleaning with the Mini Washer
Prepare the Washer and Model
1. Place the washer on a level surface. Connect the supplied washer power adapter to the unit and mains outlet. The display enters standby.
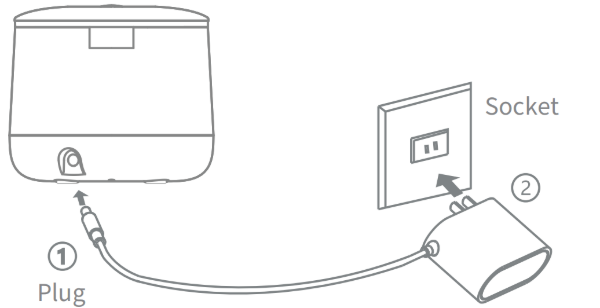
Connect the washer power adapter before loading the model
2. Open the lid and gently place the printed dental model into the tank. Keep tooth surfaces from making direct contact with the tank.
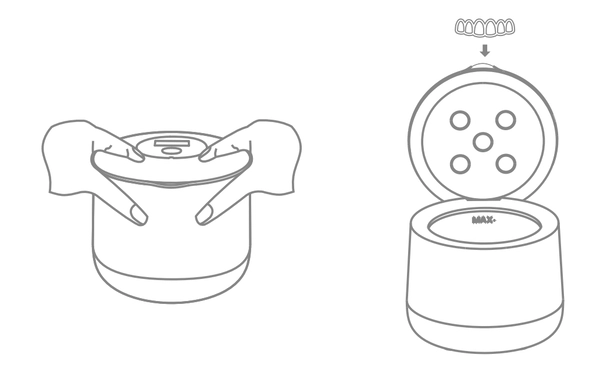
Use a level surface and keep tooth surfaces clear of the tank
Fill and Run the Washer
3. Use a measuring cup or similar container to add clean water or alcohol to the tank, as specified in the washer instructions. Do not fill above the MAX mark.
4. Press the button to start a 3 minute ultrasonic cycle. The display shows the countdown. When the cycle finishes, the indicator turns off and the display returns to standby. Press the button again to stop the unit during operation.
5. The lid may remain open or closed during cleaning. Close it gently to avoid damage. When emptying the tank, pour liquid away from the lid hinge connection.
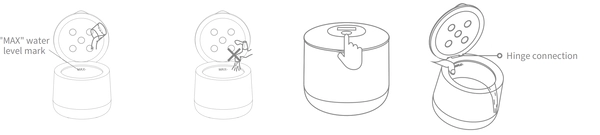
MAX fill level operating button and hinge location
Do not fill the washer directly from a tap. Water can enter the power socket or base and cause malfunction or damage. Wear disposable latex gloves when handling a model with residual resin.
Connect to Wi Fi
1. Open Settings > System Settings > WLAN.
2. Select the Wi Fi network you want to use and complete the connection.
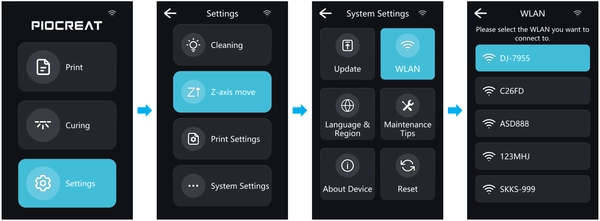
Connect the printer to WLAN
Prepare Files in PioNext BOX
Choose the Printer and Material
1. Install PioNext BOX from the supplied USB drive or download it from www.piocreat3d.com, then open the application.
2. Open the printer settings panel on the right.
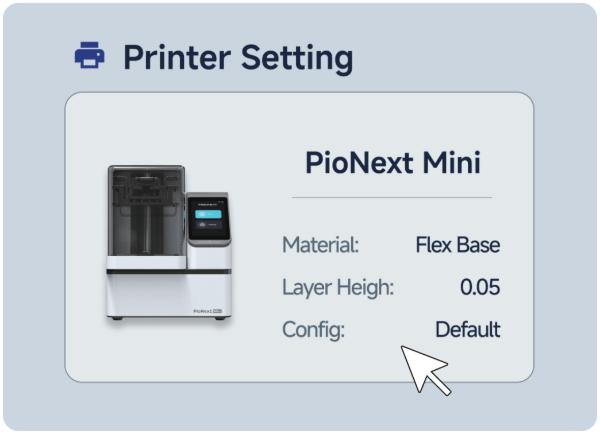
Open the printer settings panel to choose the printer and resin
3. Select PioNext Mini, the resin material and the layer thickness, then click Use.
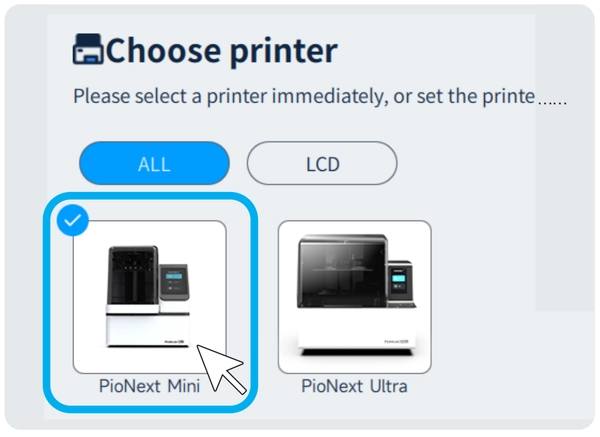
Select PioNext Mini before preparing the print
Create a Custom Material Profile
If your material is not listed, choose Create or import custom print settings. Select the printer model and click Add New Profile. Enter the profile name and parameters, then click Finish. Use Add New Brand in the material selection screen and select the newly added resin profile.
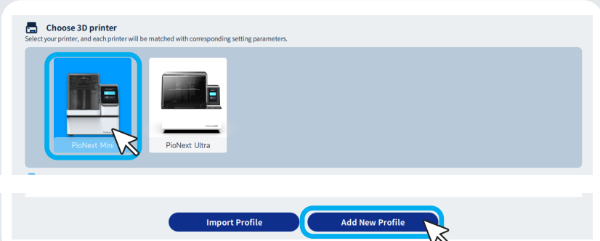
Select the printer and click Add New Profile
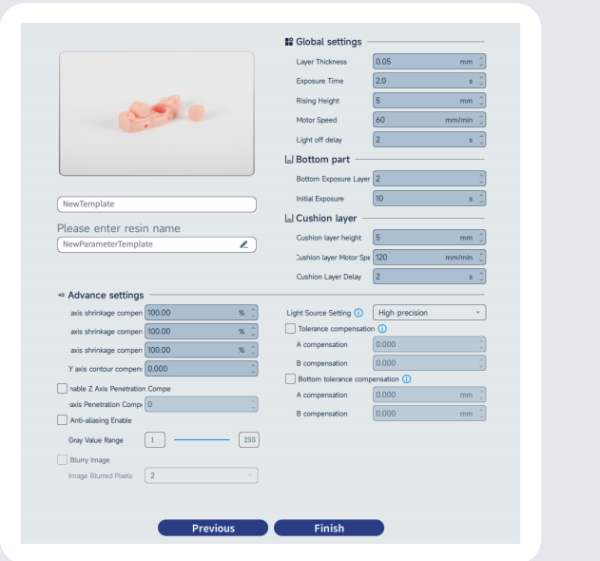
Set the resin name and print parameters then click Finish
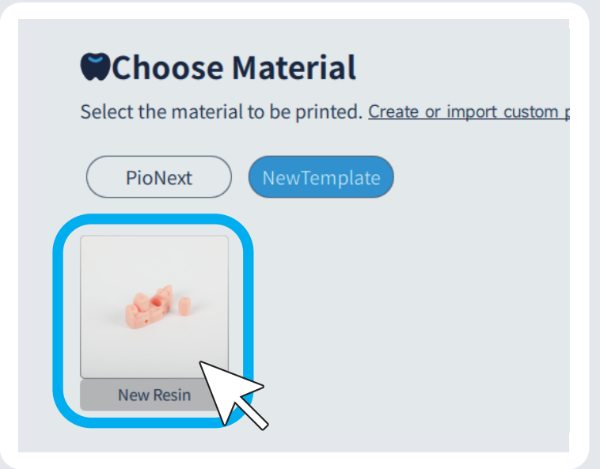
Select the newly created resin profile
Position the Model and Add Supports
1. Click Open in the left menu and select the model file.
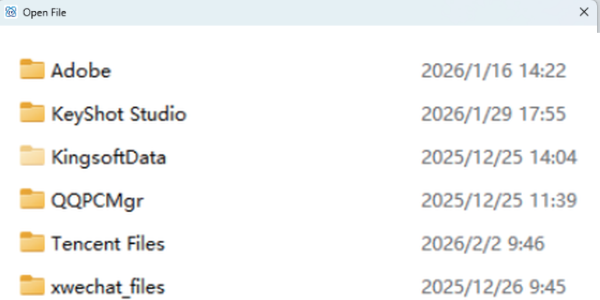
Select the model file in the Open File window
2. Select the imported model and adjust its position and orientation.
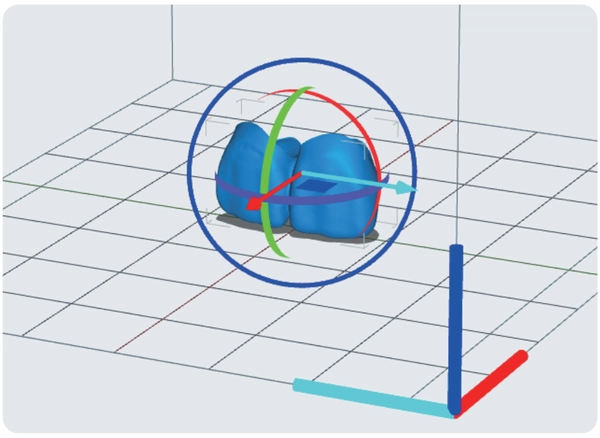
Adjust the model orientation
3. Open Support in the left toolbar and select the model. Click Auto Support Selected to generate supports automatically.
4. For manual supports, select the model and place support points on its surface. Click a point again to remove it. Click a blank area when finished.
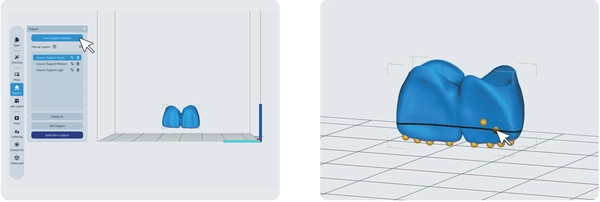
Automatic support tools and manual support points
Export to a USB Drive
1. Click Print in the bottom right corner and choose Export to local.
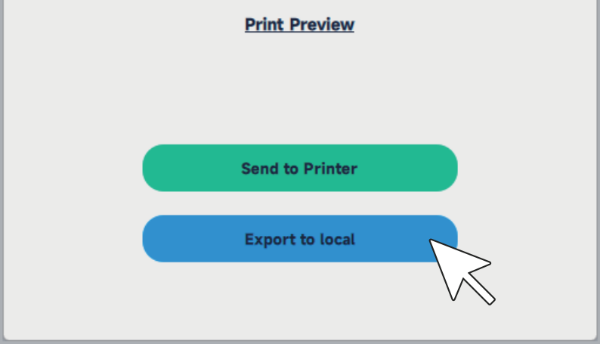
Choose Export to local to save the sliced file
2. Select the USB drive as the save location and click Save.
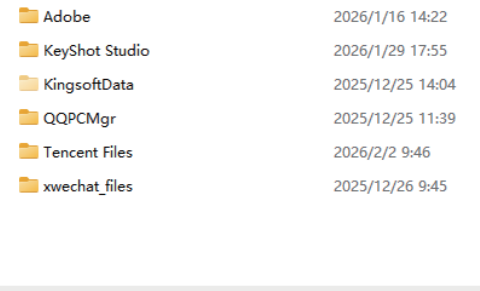
Select the USB drive location in the save dialog and click Save
3. Connect the USB drive to the printer, select the file and start the print.
Send a File over Wi Fi
1. Connect the computer and printer to the same WLAN network.
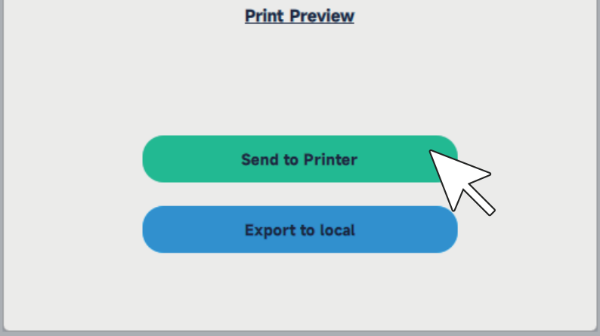
Choose Send to Printer for WLAN transfer
2. Click Print > Send to Printer. The software searches for printers and displays their IP addresses.
3. Select the PioNext Mini. Click Send to Printer to transfer the file, then select the file on the printer to start printing.
4. To start automatically after transfer, use the start print option in the transfer window.
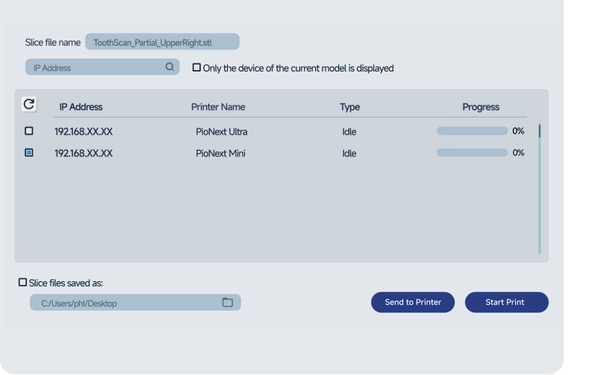
Choose the PioNext Mini for wireless transfer
Use CHITUBOX Dental
PioNext Mini also supports CHITUBOX Dental. Download the installation package and access the user guide at dental.chitubox.com. Contact customer service to request a free three month CHITUBOX Dental slicing software license.
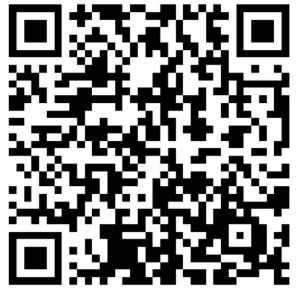
Scan to open the CHITUBOX Dental user guide
Hardware Interface Reference
The adapter board diagram identifies connections for the motherboard, curing lamp board, heating module, heated fan, curing heat sink fan, light source cooling fan, driver board, curing drawer open detection, power supply, limit switch, temperature measurement module, motor, light source and light source temperature sensor.
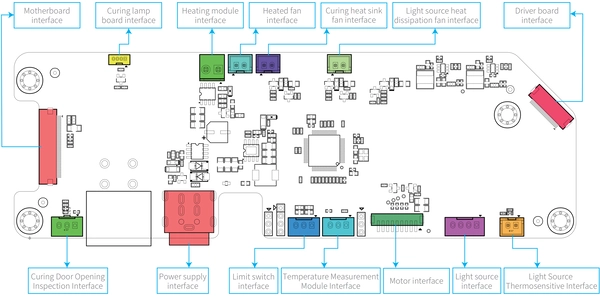
Adapter board circuit wiring diagram
Troubleshooting
Use the checks below to narrow down a printing problem. Contact after sales support if the cause is unknown or the fault remains unresolved. Internal wiring checks and component replacement should be handled with support guidance.
|
Symptom or Check |
Suggested Action |
|
USB drive or file is not recognized |
Check and clean the USB drive, reformat it if required, or try another drive. Back up files before formatting. |
|
Other files print but one file fails |
Change the model position and slice again. Repair the model with suitable repair software if necessary. |
|
The platform does not home and the motor does not run |
Check the axis motor connections. Test with a replacement motor as directed by support. |
|
The motor runs but the platform travels beyond the home position |
Check the limit switch connections and use component substitution to identify a fault. |
|
Platform contact or adhesion is incorrect |
Have after sales support check the platform leveling. |
|
The printing screen does not turn on |
Check the screen wiring. If the connection is correct and the screen remains faulty, replace the screen with support guidance. |
|
The Z axis motor rotates but the axis does not move |
Check and tighten the coupler. |
|
The Z axis motor does not rotate |
Check the motor connections and use component substitution to identify the faulty component. |
After each correction, check whether the problem is resolved. Replace a confirmed faulty component as directed by support; contact after sales service for any unknown or persistent malfunction.
Regulatory Information
Canada ISED
The device contains license exempt transmitters and receivers that comply with Innovation, Science and Economic Development Canada RSS requirements. Operation is subject to two conditions: the device must not cause interference, and it must accept interference, including interference that may cause undesired operation.
The device meets the routine evaluation exemption in section 2.5 of RSS 102 and the applicable RSS 102 RF exposure requirements. Canadian RF exposure and compliance information is available to users. Do not place or operate this transmitter together with another antenna or transmitter. Maintain at least 20 cm between the radiator and the body during installation and operation.
United States FCC
The device complies with FCC Part 15. The device must not cause harmful interference and must accept received interference, including interference that may cause undesired operation. Changes or modifications that are not expressly approved by the responsible compliance party may void the user’s authority to operate the equipment.
The equipment was tested against the Class B digital device limits under FCC Part 15, which are intended to provide reasonable protection in residential installations. It generates, uses and can radiate radio frequency energy. Incorrect installation or use can interfere with radio communications, and interference may still occur in a particular installation.
If switching the equipment off and on confirms that it interferes with radio or television reception, try the following:
- Reorient or relocate the receiving antenna.
- Increase the distance between the equipment and receiver.
- Use an outlet on a different electrical circuit from the receiver.
- Ask the dealer or an experienced radio or television technician for help.
The equipment meets FCC radiation exposure limits for an uncontrolled environment. Maintain at least 20 cm between the radiator and the body. Do not place or operate the transmitter with another antenna or transmitter.
Warranty and Support
Limited Warranty
A one year limited warranty applies from the purchase date. Release film and complimentary items such as the USB drive, gloves, screwdriver, paper funnel and brush are excluded.
Coverage applies to material and workmanship defects. Provide the relevant documents and product information, including proof of purchase, confirmation that the defective product is a PIOCREAT product, and confirmation that the user is in the country of purchase.
Warranty Exclusions
- An altered or illegible proof of purchase.
- An altered or illegible product label or serial number.
- Normal wear of accessories or consumables, including release film.
- Damage or malfunction caused by unauthorized modifications, incorrect installation or improper use.
- Damage or malfunction caused by use in an environment that is not recommended.
- Damage or malfunction caused by overload or improper maintenance, including dampness or mildew.
- Damage or malfunction caused by events such as fire, earthquake, lightning or flooding.
- Damage or malfunction caused by parts or consumables from other brands.
Contact Support
Lifetime technical support is provided for the product, excluding technical issues outside the product itself. Read the manual and warranty card, contact your local seller first when service is required, and have the product serial number ready. Consult the official website for the applicable warranty details and claim procedure.
Technical support: after@piocreat3d.com
Sales inquiries: info@piocreat3d.com
Telephone: +86 0755 2103 9743
Official website: www.piocreat3d.com
Shenzhen PioCreat 3D Technology Co., Ltd.
3rd Floor, Building 1, No. 156 Huawang Road, Langkou Community, Dalang Street, Longhua District, Shenzhen, China 518109
Note: Product appearance may differ between models and from the illustrations. Refer to the actual product supplied. Shenzhen PioCreat 3D Technology Co., Ltd. reserves the right of final interpretation.
Parts List
Use the names, SKUs and dimensions below to identify PioNext Mini parts. The Mini Washer includes a power adapter and is listed with EU and GB plug options.
|
Part |
SKU |
Dimensions |
|
Build Plate Kit |
4001140017 |
150 × 114 × 80 mm |
|
Resin Vat Kit ACF |
4001130015 |
104 × 94 × 25 mm |
|
ACF Release Film 5 pcs |
4004080024 |
110 × 100 × 0.3 mm |
|
LCD Screen Kit |
4001150020 |
162.5 × 96.5 × 4.9 mm |
|
LCD Screen Cable |
3102090408 |
95 × 29.5 × 0.1 mm |
|
LCD Screen Sealing Tape |
3203011942 |
169.6 × 0.2 × 110 mm |
|
Tempered Glass |
3205100235 |
155 × 81 × 0.45 mm |
|
Mini Washer EU plug |
1100000502 |
- |
|
Mini Washer GB plug |
1100000465 |
- |
Build Plate Kit
SKU: 4001140017 | Dimensions: 150 × 114 × 80 mm
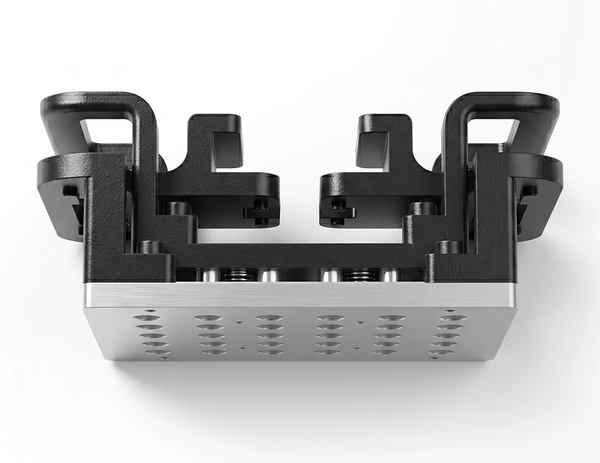
Build Plate Kit
Resin Vat Kit ACF
SKU: 4001130015 | Dimensions: 104 × 94 × 25 mm
ACF version.
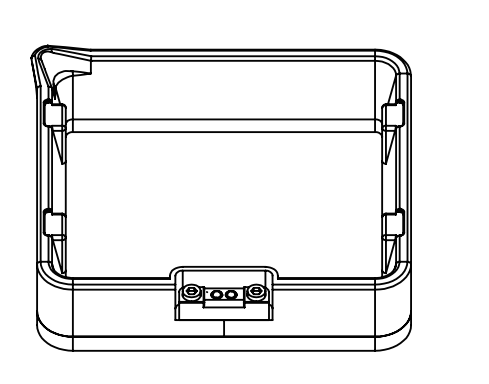
Resin Vat Kit ACF
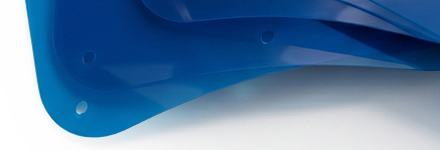
ACF Release Film 5 pcs
SKU: 4004080024 | Dimensions: 110 × 100 × 0.3 mm
Pack quantity: 5 pieces.
ACF Release Film 5 pcs detail
Installation orientation: the matte side faces the resin and the opposite side faces the screen light source. Remove the blue protective film before use.
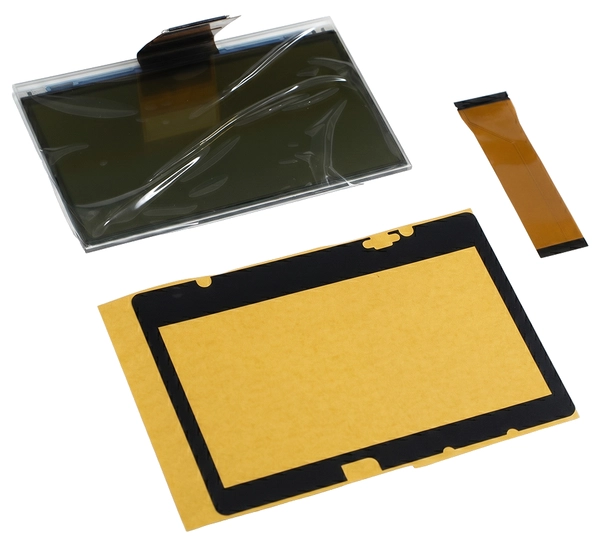
LCD Screen Kit
SKU: 4001150020 | Dimensions: 162.5 × 96.5 × 4.9 mm
Includes the LCD screen, cable and tape.
LCD Screen Kit
LCD Screen Cable
SKU: 3102090408 | Dimensions: 95 × 29.5 × 0.1 mm
Color: Gold.
LCD Screen Sealing Tape
SKU: 3203011942 | Dimensions: 169.6 × 0.2 × 110 mm
Material: PVC. Color: Black.
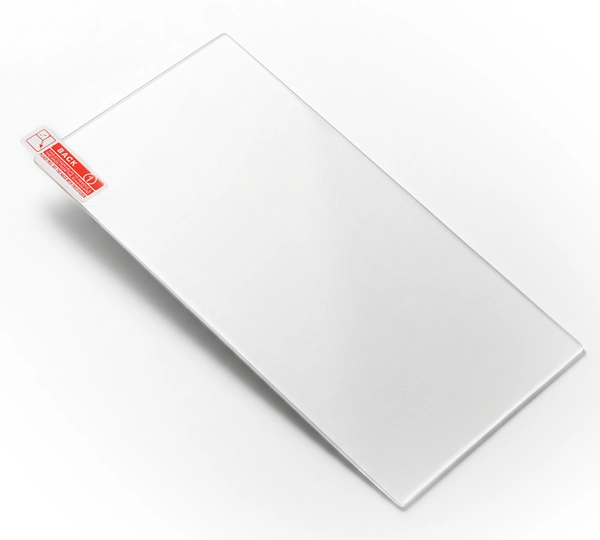
Tempered Glass
SKU: 3205100235 | Dimensions: 155 × 81 × 0.45 mm
Tempered Glass
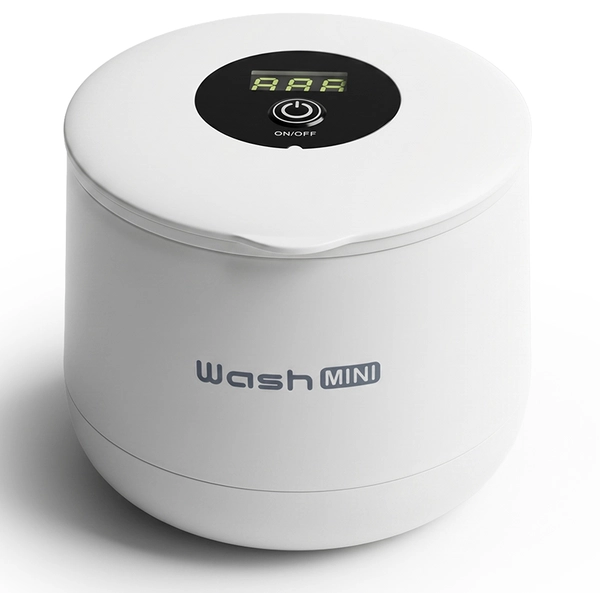
Mini Washer
SKU: 1100000502 EU plug; 1100000465 GB plug
Includes the power adapter.
Mini Washer